When building web apps, developers frequently have to handle different types of media, some of which can be complex. In this article, we’ll create our own video streaming server using Node.js.
If you follow this tutorial step-by-step, you’ll be able to build a video streaming server with Node.js that you can integrate into your own project. To follow along with this article, you can check out the GitHub repo.
Project overview
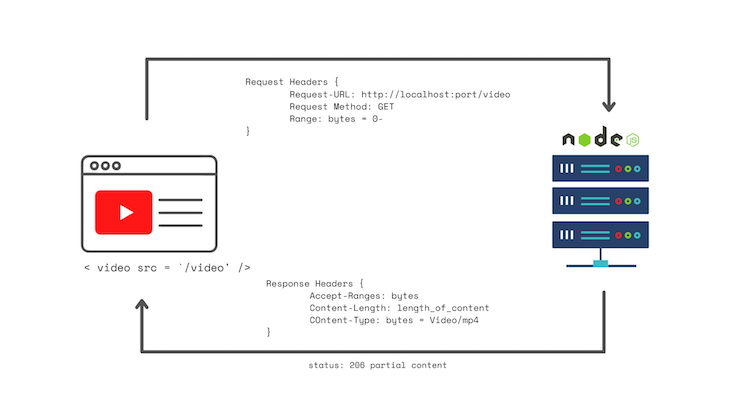
Before we begin coding our project, let’s review how our app will work at a high-level. In the image above, the browser is on the left and the server is on the right. On your site, you’ll have an HTML5 video element with a source that points to the /video endpoint.
First, the video element makes a request to the server, then the header provides the desired range of bytes from the video. For example, at the beginning of the video, the requested range would be from the 0th byte onwards, hence the 0-. The server will respond with a 206 HTTP status, indicating it is returning partial content with the proper header response, which includes the range and content length.
The response headers indicate to the video element that the video is incomplete. As a result, the video element will play what it has downloaded so far. When this happens, the video element will continue making requests, and the cycle will continue until there are no bytes left.
Application pros and cons
Now that we understand how our app will work, let’s consider some of the pros and cons of following this methodology.
As you may have guessed from the application overview, our streaming server will be fairly simple to implement. Essentially, we’re creating a file system and returning it back to the client. Our server will allow us to select timeframes throughout the video and decide how big of a payload to send back. For mine, I chose 1MB, but you have the freedom to play around with it.
However, because of our app’s simplicity, the server and video player don’t work as well together as we would like. Essentially, the video player will just request the part of the video you’re on, without taking into account what you already requested. It’s likely that you’ll end up requesting some of the same resources over and over again.
Getting started
First, we’ll set up a new folder and initialize npm:
npm init
Now, install Express and nodemon:
npm install --save express nodemon
Given that your video element is an empty folder, you’ll need to generate an HTML file as follows:
<!DOCTYPE html>
<html lang="en">
    <head>
        <meta charset="UTF-8" />
        <meta http-equiv="X-UA-Compatible" content="IE=edge" />
        <meta name="viewport" content="width=device-width, initial-scale=1.0" />
        <title>Video Streaming With Node</title>
        <style>
            body {
                margin: 5% auto;
                max-width: 100%;
                background-color: rgb(14, 14, 14);
                padding-top: 10%;
                padding-left: 35%;
            }
        </style>
    </head>
    <body>
        <video id="videoPlayer" width="50%" controls muted="muted" autoplay>
            <source src="/video" type="video/mp4" />
        </video>
    </body>
</html>
Writing the /video endpoint
Next, we’ll write the /video endpoint. Eventually, when you test the HTML code above, you should have a media element on the screen.
For this to work, we’ll first need to create a new JavaScript file that will house all our functions. In this new file, we’ll import Express and fs, which stands for file system. fs will create a file stream, then return it to the client in the /video endpoint. Run the code below:
const express = require("express");
const app = express();
const fs = require("fs");

app.get("/", function (req, res) {
    res.sendFile(__dirname + "/index.html");
});

 // more code will go in here just befor the listening function

app.listen(8000, function () {
    console.log("Listening on port 8000!");
});
Now, we’ll create a function for the /video endpoint. You need to make sure there is a range header. Otherwise, you won’t be able to tell the client what part of the video you want to send back. The if statements handles this, returning a 400 Error alerting the client that it needs a range header:
app.get("/video", function (req, res) {
    const range = req.headers.range;
    if (!range) {
        res.status(400).send("Requires Range header");
    }
});
We also need to provide the path and the size of the video. As long as your video is in the same directory as the JavaScript file, there is no need to add a bunch of slashes. However, if the video is not in the same directory as the JavaScript file, you’ll need to provide the relative path, like in the example below:
const videoPath = "Chris-Do.mp4";
const videoSize = fs.statSync("Chris-Do.mp4").size;
Now, the new file should look like the following code block:
const express = require("express");
const app = express();
const fs = require("fs");

app.get("/", function (req, res) {
    res.sendFile(__dirname + "/index.html");
});
app.get("/video", function (req, res) {
    const range = req.headers.range;
    if (!range) {
        res.status(400).send("Requires Range header");
    }
    const videoPath = "Chris-Do.mp4";
    const videoSize = fs.statSync("Chris-Do.mp4").size;
});

app.listen(8000, function () {
    console.log("Listening on port 8000!");
});
Parsing the range
Next, we’ll parse the range, seen in line 10 in the code block above. I’ll give it 1MB at a time, which is known as a chunk size:
const CHUNK_SIZE = 10 ** 6; // 1MB
const start = Number(range.replace(/\D/g, ""));
Now, we’ll parse the starting byte from the range headers. Since it is a string, you need to convert it to a number using the line below:
const start = Number(range.replace(/\D/g, ""));
Notice that I subtract one from the videoSize in the end chunk because that is the last byte. If there are 100 bytes in a video, then the 99th byte is the last one because we begin counting from zero in computer science.
Now, you need to calculate the ending byte that you’ll send back. First, add the chunk size, which is 1MB, to the starting chunk. As the server continues sending back 1MB to the starting chunk, eventually, the total size of the bytes sent could surpass the size of the video itself.
In this case, you’ll need to return the video size. You can do so using the Math.min function, which takes the minimum of the two parameters given, summarized by the line below:
const end = Math.min(start + CHUNK_SIZE, videoSize - 1);
Creating response headers
Now, we need to create the response headers that we’ll return. First, calculate the content length with end-start + 1.
Then, we’ll create the headers object. In the content range, you need to use the starting byte, the end byte, and the video size, as follows:
const headers = {
    "Content-Range": `bytes ${start}-${end}/${videoSize}`,
    ... // this ... just indicates that there is more code here.
        // it is not part of code.
}
With the code above, the video player knows how far along it is based on the video size itself. After that, we’ll specify the type of data we’ll send back. Add the content length and the video type. Your headers object should look like the code below:
const headers = {
    "Content-Range": `bytes ${start}-${end}/${videoSize}`,
    "Accept-Ranges": "bytes",
    "Content-Length": contentLength,
    "Content-Type": "video/mp4",
};
Now, we need to write a response for the request. I am using 206 as the status, indicating that I’m sending partial content. With this, you should also set the headers as follows:
// HTTP Status 206 for Partial Content
res.writeHead(206, headers);
We need to use the file system library to create the readstream, using the video path as an argument and the start and end as an options in the options object:
const videoStream = fs.createReadStream(videoPath, { start, end });
videoStream does not do anything by itself. We need to pipe it into the response we had at the start of the function:
videoStream.pipe(res);
If you’ve been following step-by-step, your file should look like the following code:
const express = require("express");
const app = express();
const fs = require("fs");

app.get("/", function (req, res) {
    res.sendFile(__dirname + "/index.html");
});

app.get("/video", function (req, res) {
    const range = req.headers.range;
    if (!range) {
        res.status(400).send("Requires Range header");
    }
    const videoPath = "Chris-Do.mp4";
    const videoSize = fs.statSync("Chris-Do.mp4").size;
    const CHUNK_SIZE = 10 ** 6;
    const start = Number(range.replace(/\D/g, ""));
    const end = Math.min(start + CHUNK_SIZE, videoSize - 1);
    const contentLength = end - start + 1;
    const headers = {
        "Content-Range": `bytes ${start}-${end}/${videoSize}`,
        "Accept-Ranges": "bytes",
        "Content-Length": contentLength,
        "Content-Type": "video/mp4",
    };
    res.writeHead(206, headers);
    const videoStream = fs.createReadStream(videoPath, { start, end });
    videoStream.pipe(res);
});

app.listen(8000, function () {
    console.log("Listening on port 8000!");
});
Before wrapping up, you simply need to add "start": "nodemon index.js" to your package.json file:
"scripts": {
      "start": "nodemon index.js" //this is the main line you need to add
},

//note that the index.js is just the name of my file. yours might be named differently
To see the final output, simply run npm start.
Conclusion
In this tutorial, we learned to build our own video streaming server using Node.js. First, we covered the project architecture in depth, then we elaborated on the pros and cons of following a simple methodology. Then, we build our app by creating the /video endpoint, parsing the range, and creating the response headers.
By following the steps in this tutorial, you can build your own Node.js video streaming server that you can integrate into your own application. I hope you enjoyed this article!
200’s only  Monitor failed and slow network requests in production
Deploying a Node-based web app or website is the easy part. Making sure your Node instance continues to serve resources to your app is where things get tougher. If you’re interested in ensuring requests to the backend or third party services are successful, try LogRocket. https://logrocket.com/signup/
LogRocket is like a DVR for web and mobile apps, recording literally everything that happens while a user interacts with your app. Instead of guessing why problems happen, you can aggregate and report on problematic network requests to quickly understand the root cause.LogRocket instruments your app to record baseline performance timings such as page load time, time to first byte, slow network requests, and also logs Redux, NgRx, and Vuex actions/state. Start monitoring for free.