It may be challenging to transition from React Router v5 to v6, because several changes have altered how things were done in React Router v5. In addition, a number of new features have been introduced, so it is recommended to upgrade to v6 even if the transition will be slightly annoying.
To upgrade from React Router v5 to v6, you’ll either need to create a new project or upgrade an existing one using npm. React Router v6 also makes extensive use of React Hooks, requiring React v16.8 or above.
In this article, we’ll look at issues with React Router v5, what changed, how to upgrade to v6, and what benefits this upgrade has to offer. In order to follow along, you should be familiar with React Router.
Issues with React Router v5
React Router v5 came the close to perfection, but there were still some flaws.
First, history.push() does not trigger navigation; it was observed that history.push() updated the browser’s url but does not navigate to the path. Learn more about the issue here.
Next, push and replace retain previous search and hash strings. When the push or replace method is executed on history, the search and hash strings from the previous routes remain in the new route. Learn more about the issue here.
Another issue is that Routes queries route paths with the most similar naming instead of with exact naming. For instance, a route name /test would still be called if the browser route is /, /t, /te, /tes, or /test, which is incorrect. Developers have to specify the prop exact to strictly query route names.
Finally, defining routes with the same path but optional parameters needs special arrangements. For instance, when defining the route /games and another route with the same name, the parameter /games/:id is required. Developers need to arrange the definition so the route with the parameter comes first, otherwise the routes don’t work as expected.
// The correct way: Here '/games' will render 'Games' component but not 'SelectedGame', because it does not have a parameter 'id'. While '/games/:id' will render only the 'selectedGame' component
<Router>
  <Route path="/games/:id" component={SelectedGame} />
  <Route path="/games" component={Games} />
</Router>

// The wrong way: Here either '/games' or '/games/:id' will render the 'Games' components
<Router>
  <Route path="/games" component={Games} />
  <Route path="/games/:id" component={SelectedGame} />
</Router>
The code snippet above illustrates the right and wrong way to order routes that are related by paths or parameters. The first example is the most suitable order, while the second example allows only the route /games to render for any situation where /games has a parameter.
Having considered the issues with React Router v5, we will now discuss how to migrate and what has changed that makes React Router v6 different.
Migrating to React Router v6
The following sections will teach you how to upgrade to React Router v6 in projects where React Router is already installed, and from scratch.
Upgrading React Router in a project where it is already installed
To upgrade the React Router version, open a terminal and navigate to the project directory where you wish to upgrade it.
To see a list of the project’s dependencies, use the following command:
npm ls
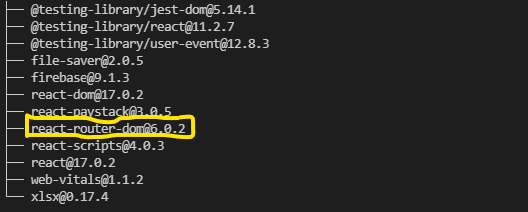
You should see a list like this:

Although the list generated may not be exactly the one above, if you have React Router installed, you should see the most recent version.
Next, run the following command to initiate an upgrade:
npm install react-router-dom@latest
If you execute this command without being connected to the internet, it will fail because some files must be downloaded during the installation. If everything is in order, you should see something similar; in our case, the most recent version is v6.0.2:
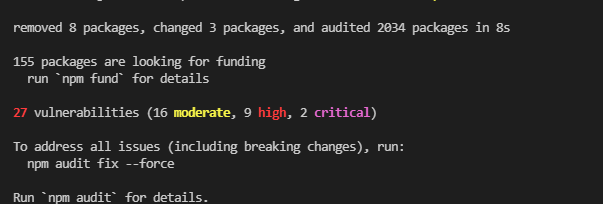
If everything goes well, we should notice that React Router has been updated when we run the npm ls command again.
Installing React Router from scratch
First, open a terminal in a project directory where React Router isn’t installed. To install a specific version of React Router, run:
npm install react-router-dom@[VERSION_TO_BE_INSTALLED]
Replace [VERSION_TO_BE_INSTALLED] with the version you want to install.
Next, run the following code to install the newest version:
npm install react-router-dom
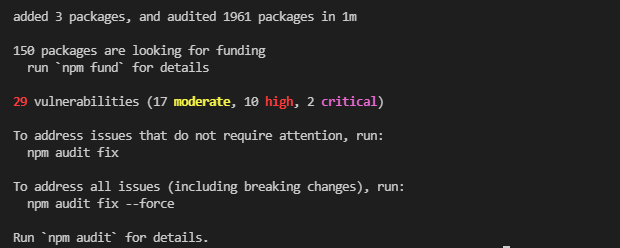
This installation also demands the use of the internet. If the installation went well, you should see something similar to this:
What changed?
It’s important to understand what changed so that we can see why upgrading to React Router v6 is helpful. Note that in certain circumstances, developers will downgrade a program to increase functionality or avoid issues.
We will go through the changes in React Router v5 that one should think about when choosing which version to implement in a project.
Setting up routes
We had around three different techniques for generating routes in React Router v5, which caused confusion. They are as follows:
The first technique is to pass the component and path as prop of the Route component:
<Route path="/games" component={Games} />
This works well, however we are unable to pass props to the rendered component.
The second is to pass in the component as a child of the Route component:
<Route path="/games">
<Games count=”10” category=”Action” />
</Route>
We may pass custom props to the component we want to render using this approach.
The third and final technique is to use the render prop where a function returns the component to be rendered:
<Route path="/games" render={(props) => <Games {…props} />} />
This also works and lets us to give props to the component we’re rendering. However, it is ambiguous and prone to inaccuracy.
In React Router v6, routes have been simplified to the point that we no longer need to utilize Switch to query them. Instead, we utilize a “required” component called Routes, which only searches for routes by name. The * character can be used to query using a wildcard.
We then supply the component to be rendered to the Route component as element props. We can also supply custom props to the components in each route that we wish to render.
The code snippets below demonstrate how to define routes in v6:
<Routes>
  <Route path="/games" element={<Games />} />
  <Route path="/movies" element={<Movies genre="Action" age="13" />} />
</Routes>
You can also use useRoutes to query the routes in the app. To do this, we must alter the index.js content, where we change the App wrapper from React.StrictMode to BrowserRouter as below:
import React from 'react';
import ReactDOM from 'react-dom';
import App from './App';
import { BrowserRouter } from 'react-router-dom'
ReactDOM.render(
  <BrowserRouter>
    <App />
  </BrowserRouter>,
  document.getElementById('root')
);
Then, in the App.js file, we define the routes by performing the following:
import { Outlet, useRoutes } from 'react-router-dom';
const App = () => {
  let routes = useRoutes([
    {
      path: '/',
      element: <div>Hello Index</div>
    },
    {
      path: 'games',
      element: <Games />,
      children: [
      {
        path: '',
        element: <div>Games Index</div>
      },
      {
        path: ':id',
        element: <div>Game Details</div>
      }
    ]
  }
]);
  return routes;
}
export default App
const Games = () => {
  return (
    <div className="Games">
      <div>This is the Games pages</div>
      <Outlet />
    </div>
  );
}
Here, we imported Outlet and useRoutes. useRoutes allows us to define the routes as an array of objects in which we can specify a path, the element to be rendered when the path is browsed, and sub-paths. Outlet helps us render the child route that matches the current path.
Redirect to another route
In React Router v5, we use useHistory() to redirect, and as previously mentioned, there have been concerns with this technique.
To implement it, we normally do the following:
import { useHistory } from "react-route-dom";

const App = () => {
  const history = useHistory();
  const handleClick = () => {
    history.push("/home")
  }
  return (
    <div>
      <button onClick={handleClick}>Go Home</button>
    </div>
  )
}
export default App
In v6, we use useNavigate like so:
import { useNavigate } from "react-router-dom";

const App = () => {
  const navigate = useNavigate();
  const handleClick = () => {
    navigate("/home");
  }
  return (
    <div>
      <button onClick={handleClick}>Go Home</button>
    </div>
  );
}
export default App
Learn more about redirecting with useNavigate instead of useHistory.
Specifying exact route paths in NavLink
In v5, when enforcing an exact path or route, we use the exact prop. To implement this we do the following:
<NavLink to="/index" exact>Go Home</NavLink>
In v6, we use the end prop to ensure exact routes:
<NavLink to="/index" end>Go Home</NavLink>
Styling an active NavLink
In React Router v5, we use the activeClassName or activeStyle props to style a NavLink that is currently active.
For instance:
<NavLink to="/home" style={{color: 'black'}} activeStyle={{color: 'blue'}} className="nav_link" activeClassName="active" >Go Home</NavLink>
In v6, we can now use a function with the argument isActive to condition the style or className to be used for an active NavLink.
For instance:
<NavLink to="/home" style={({isActive}) => ({color: isActive ? 'blue' : 'black'})} className={({isActive}) => `nav_link${isActive ? " active" : ""}`} >Go Home</NavLink>
Use useMatch instead of useRouteMatch
In v5, useRouteMatch was used to create relative subroute paths that matched a particular route.
In v6, we use useMatch for this. Using the useMatch hook requires a pattern argument and does not accept patterns as an array.
What was removed?
In React Router v6, some features are no longer supported, either because they are ambiguous or faulty. So far two features were found to have been removed:
First, usePrompt was used to confirm whether a user want to exit a page, when the page is in a state that does not require the user to leave.
Second, useBlocker is similar to usePrompt, and was used to prevent users from leaving a particular page.
These two feature are similar and gave the same issue. In a situation where a user tries to navigate outside a page and navigation is restricted by either usePrompt or useBlocker, the URL path changes even though the navigation is prevented.
Although there were issues raised about useBlocker and usePrompt, the creators are still considering adding them back to v6 after they release a stable version. Check here for more details.
Benefits of React Router v6 over v5
It’s pointless to migrate if one version doesn’t offer any advantages over the other. In this section, we’ll talk about the benefits of upgrading from React Router v5 to v6.
One of the most important considerations for developers is the application’s portability. The size of React Router v6 has been reduced significantly compared to previous versions. The difference between v5 and v6 is around 60 percent.
Here is a comparison from Bundlephobia:
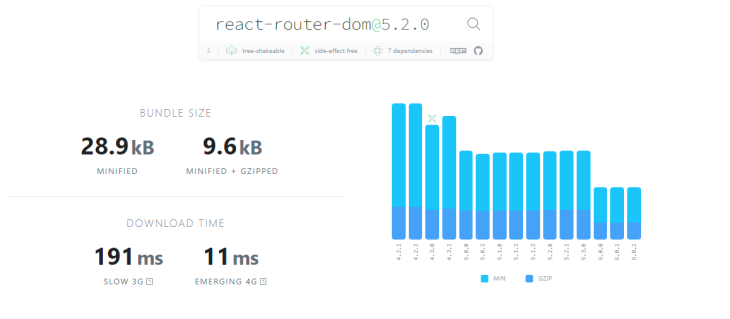
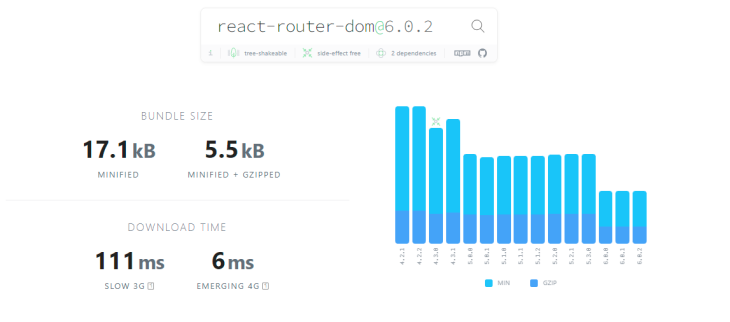
Compiling and deploying apps will be easier and faster as a result of the size reduction.
In addition, the bulk of the modifications in React Router v6 that we covered are more beneficial and have fewer issues.
As previously mentioned, React Router v6 allows routes to accept components as elements when constructing routes, and pass custom props to components. We may also nest routes and use relative links as well. This helps us prevent or reduce the definition of new routes inside various component files, and it also makes it easy to pass global data to components and props.
When redirecting instead of using useHistory (which had issues with updating the URL), the new approach using useNavigate has been design to fix the issue of redundant URL. It allows us to set the new route manually (navigate("/home")) instead of updating stale routes (history.push("/home")), which might be a bit ambiguous.
Finally, navigation link NavLink allows us to condition active links, which makes our code neater and simpler. Instead of passing two separate props for an active and inactive state. By doing this, we can easily use a ternary operator to condition which style will be affected when a link is active or not.
Conclusion
After reading this article, I hope you are able to upgrade your React Router version and restructure your codebases to work seamlessly with React Router v6.
Not only should React Router v5 be upgraded to v6, but Reach Router should be switched to v6 as well.
Regularly upgrade React Router v6 and review the documentation for any changes to stay up-to-date with new releases.
Full visibility into production React apps
Debugging React applications can be difficult, especially when users experience issues that are hard to reproduce. If you’re interested in monitoring and tracking Redux state, automatically surfacing JavaScript errors, and tracking slow network requests and component load time, try LogRocket.
LogRocket is like a DVR for web and mobile apps, recording literally everything that happens on your React app. Instead of guessing why problems happen, you can aggregate and report on what state your application was in when an issue occurred. LogRocket also monitors your app’s performance, reporting with metrics like client CPU load, client memory usage, and more.
The LogRocket Redux middleware package adds an extra layer of visibility into your user sessions. LogRocket logs all actions and state from your Redux stores.
Modernize how you debug your React apps — start monitoring for free.